How to Test a React Native App in 2026: The Full Pyramid, and Where Teams Stall
Jest and RNTL cover units and components in an afternoon. The end-to-end layer is where React Native suites rot. Here is the full stack, and how to get past it.

A React Native app can rename a testID in a refactor and keep working, while every end-to-end step that hardcodes the old one goes red. Jest and React Native Testing Library cover units and components in an afternoon and stay cheap. The end-to-end job is the one that ends up allowed to fail.
Every selector-based step finds the screen by a string the app is free to change, and React Native’s own docs call end-to-end tests “more prone to flakiness”. Here is how to keep the three cheap layers and stop the fourth from rotting.
What you’ll learn
- The four layers of React Native testing and what each one costs to keep
- A component test that runs on React Native Testing Library 14
- Detox, Maestro, and Appium for E2E, and the identifier coupling all three share
- How to test performance, and when an emulator stops telling you the truth
- Why the E2E layer rots, and a vision-based approach with no selectors to maintain
Four Layers of React Native Testing
React Native testing splits into four layers, and each one trades speed for confidence. The official React Native docs list five kinds of test, separating integration from component. In practice those two collapse into the same tooling and the same afternoon of work. This guide treats them as one layer and keeps the count at four.
- Static analysis: ESLint and TypeScript come configured in the default React Native template and catch type errors and unused code before a single test runs.
- Unit tests: Jest, the template’s default runner, verifies pure logic. Helpers, hooks, reducers, formatting functions.
- Component and integration tests: React Native Testing Library renders a component on a simulated React Native runtime and asserts on what a user would see, with no emulator booted.
- End-to-end tests: Detox, Maestro, or Appium drive a compiled build on a simulator or emulator and replay a full user flow.
Stacked, the four make the familiar testing pyramid. The mistake is treating its layers as equally expensive. The first three are close to free once they are wired up, because nothing about them touches a compiled binary. The fourth does, and that is where the maintenance budget goes. The four layers carry over to testing a mobile app on any stack, and the sections below cover what React Native changes in each.
How to Write Unit and Component Tests
Unit and component tests are the cheapest layer to get right, with Jest and RNTL doing most of the work. Jest runs your logic in a Node environment with mocking and assertions built in. RNTL renders a component and fires events the way a user would, then queries the result by visible text or role instead of internal structure.
The pattern that holds up is Arrange, Act, Assert. The rule that matters more than the pattern is to test behavior, not implementation. Query by what the user sees, never by a component’s internal state.
Since RNTL 14, released in June 2026, render and fireEvent return promises, and the library raised the floor for the rest of the stack. Projects on React 18 stay on RNTL 13. Version 14 needs:
- React and React Native: React 19 and React Native 0.78 or later.
- Node.js: 22.13 or later on the 22 line, or 24 and up.
- Renderer: The
test-rendererpackage as a dev dependency, replacing the deprecated React Test Renderer.
Written the older synchronous way, the test below fails on RNTL 14.1.0 with an error saying the render function has not been called, because nothing is on screen when the query runs. Make the test async and await both calls.
import { render, screen, fireEvent } from '@testing-library/react-native';
import LoginForm from '../LoginForm';

test('shows an error when the email is empty on submit', async () => {
  // Arrange: render the component
  await render(<LoginForm />);

  // Act: submit without typing an email
  await fireEvent.press(screen.getByText('Log in'));

  // Assert: the user sees the validation message
  expect(screen.getByText('Email is required')).toBeVisible();
});
Notice there is no testID in that test. It finds the button by its label and the error by its text, the two things a person would look for. RNTL’s query docs rank getByTestId last and say testID attributes do not resemble how your software is used and should be avoided when possible. The docs then call them useful for end-to-end testing, with Detox as the example. That handoff is where the coupling enters your suite.
One constraint applies at this layer. Jest runs in Node, where no native code executes, and React Native’s docs are explicit that a JS unit test cannot reach a module written in Java or Objective-C. Live network calls, the other trap, make the suite slow and unstable. Mock both and keep this layer fast. On React Native 0.85 and later the Jest preset lives in its own package, so jest.config.js needs preset: '@react-native/jest-preset'.
How to Run End-to-End Tests on a Compiled Build
End-to-end testing drives the real, compiled version of your React Native app through whole user flows on a simulator or emulator. It catches what unit tests cannot, such as a native module that works on Android and fails on iOS, or a checkout screen that renders correctly and does not submit. Three frameworks come up in nearly every React Native testing guide, and each makes a different trade.
- Detox: A gray-box framework from Wix, designed around React Native. Its latest stable release is 20.51.4, from June 2026. It monitors the app’s internal state and waits for pending work to settle instead of sleeping, which removes a whole class of timing flake. The cost sits in the matchers, where
by.id()maps straight to atestIDprop. An engineer at a React Native company told us Detox had served their team for a couple of years, but some tests stayed flaky and its tie to the app build got in the way of upgrading components. They were trying Maestro as the replacement. - Maestro: A newer tool from Maestro.dev with a readable YAML flow format that covers React Native, fully native, and hybrid apps. It is actively developed, and CLI 2.11.0 shipped on 29 September 2026. Setup costs less, and a step still finds an element by text, id or a coordinate. Maestro also has experimental AI assertions that check a screenshot against a plain-language statement.
- Appium: The most portable option, driving iOS through the XCUITest driver and Android through UiAutomator2, both over the W3C WebDriver protocol. Appium 3 is the current stable line, with a 4.0 beta in testing. It is also the most locator sensitive, because XPath is the most position-dependent way to name an element that any of these tools offer.
A typical Detox login spec looks like this, with the coupling in plain sight on every line.
describe('Login flow', () => {
  it('signs in and lands on the dashboard', async () => {
    await element(by.id('email-input')).typeText('[email protected]');
    await element(by.id('password-input')).typeText('hunter2');
    await element(by.id('login-button')).tap();
    await expect(element(by.id('dashboard-header'))).toBeVisible();
  });
});
The Appium against Detox decision comes down to portability versus synchronization, and neither side of that trade changes the by.id(...) on every line.
Why End-to-End Tests Break When the App Does Not
End-to-end tests break for two reasons, neither of them a bug in your app. A red build with no bug behind it still costs a full triage.
- Identifier coupling: Detox, Maestro, and Appium suites all name each element by a string the test hardcodes. Rename a
testID, restructure a screen, or swap in a design-system component, and the test fails with nothing wrong in the app. - Timing coupling: The test waits on something it does not control. When an animation runs long, a network call stalls, or the JavaScript thread stays busy, a fixed wait loses the race.
Detox does mitigate the second one. Its gray-box hook watches the app’s work queues and waits for them to drain. A black-box driver cannot see those queues, so it has to poll the screen and wait instead, which is what Maestro’s built-in waiting does. Nothing mitigates the first one, because a selector-based step reaches its element by naming it.
You can soften the coupling without removing it. Detox and Maestro both offer text and accessibility-label matchers, and Appium has accessibility IDs, so nobody is forced to route everything through testID or XPath. That trades one string for another. Product copy and translations change on their own schedule, and a label matcher breaks on a translation the same way an ID matcher breaks on a refactor. The coupling moves to a new string and stays.
If teams kept their identifiers clean, an Appium script would just work. Historically that has never played out, and the fourth layer is where it shows.
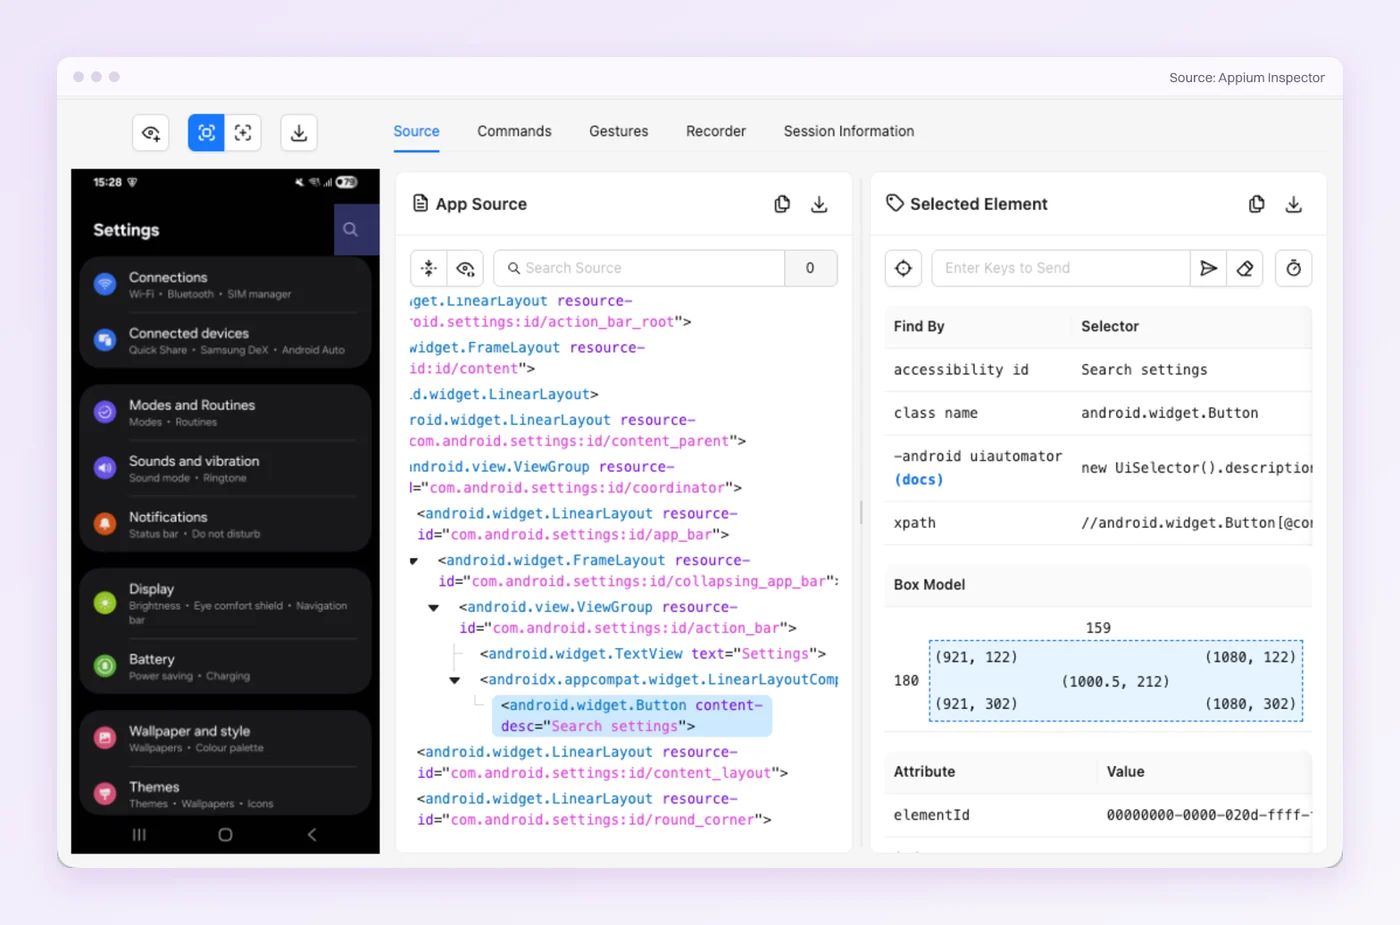
On mobile the bill comes in twice. The same flow runs on two operating systems with their own view hierarchies and their own timing. A shared testID turns both runs red at once, and an XPath written against one platform’s tree has to be written again for the other, one more reason mobile E2E tests flake in ways web suites do not.
Then there is 2026. A coding assistant that writes some of the components under your tests can rename a prop without the half-second of hesitation that stops a person on a Friday, and the suite’s only grip on the UI is a string somebody is about to change.
Every selector-based tool signs the same contract with your markup, and your markup never signed back.
Test Without the testIDs
Hand Pie your React Native build. Skip the testID repairs.
React Native Testing Tools Compared
The React Native testing tools split by which layer they serve and, more usefully, by how they find an element on screen. The last column below is the one that predicts your maintenance bill. Tools that resolve a hardcoded identifier break when it changes. A tool that works from the rendered screen has none to break.
| Tool | Layer | How it finds elements | Upkeep when the UI changes |
|---|---|---|---|
| Jest | Unit | Not applicable, runs logic with no UI | Low |
| React Native Testing Library | Component | Role and visible text first, testID last | Low |
| Detox | E2E | testID first, plus text and label matchers | High |
| Maestro | E2E | testID, visible text, accessibility labels | Medium to high |
| Appium | E2E | Accessibility IDs, platform locators, XPath, image matching through a plugin | High |
| Pie | E2E | A screenshot of each step, the way a user sees it | Lower (no selectors to maintain) |
Keep Jest and RNTL. They are excellent at what they do and cost almost nothing to maintain. The row that moves your maintenance curve is the bottom one, where Pie is the only entry that lets you author supported tests without maintaining selectors.
How to Test React Native Performance
React Native performance testing measures how the app behaves under real interaction. Frame rate during scrolling and animation, cold and warm startup time, and load on the JavaScript thread. A functional test never catches these failures, because the screen renders correctly, only slowly. A list that stutters at 30 frames per second passes every assertion you have and feels broken anyway.
Profile in two passes, because the tools that surface a problem while you develop are not the ones that measure it on a release build.
- During development: Toggle Show Perf Monitor in the dev menu for separate JS-thread and UI-thread frame rates, then use React Native DevTools for re-renders and stalls. DevTools is the Hermes-based debugger that became the default in React Native 0.76, six months after 0.74 pulled Flipper’s native libraries out of new projects. Since React Native 0.83 it also has a Performance panel that records JavaScript execution and network events on one timeline.
- On release builds: Measure with the Android Studio Profiler, Xcode Instruments, or Firebase Performance Monitoring. Firebase records app start time and, on Android only, slow rendering frames through the React Native module’s
startScreenTrace, the share of screen instances where more than half the frames take longer than 16 milliseconds to render.
Performance bugs hide on fast hardware. An emulator on a fast laptop smooths over the jank that a mid-tier Android phone from two years ago shows almost at once. Profile on the low end of your supported device range, not the top of it.
Which Tests Need Real Hardware, and Why iOS Needs a Mac
Emulators and simulators are where you run most React Native tests. Real devices are where you confirm what an emulator cannot reproduce.
What an Emulator Cannot Tell You
An emulator is fast, free, and scriptable in CI, which makes it right for the bulk of your functional and end-to-end runs. Real hardware catches what an emulator cannot fake:
- Thermal throttling: Slowdowns under sustained load.
- Sensors: Biometrics and the camera.
- Radios: Bluetooth and NFC.
- Android skins: The manufacturer layers that phones ship with.
Neither replaces the other. Device clouds like BrowserStack and AWS Device Farm cover the hardware matrix without a physical lab, and they pair naturally with the mobile regression testing pass you run before every release.
Why iOS Testing Needs a Mac
React Native’s own setup documentation is direct about it. A Mac is required to build projects with native code for iOS. Xcode and the iOS Simulator run only on macOS, so a Windows or Linux developer can cover the Android side locally and needs a hosted macOS runner for anything iOS.
Shipping a fix also works differently on mobile than on the web. There is no rollback on the App Store. If a bad build ships, you cannot revert to the previous version. You create a new version with a higher version number and send it through App Review again, though you can ask for an expedited review for a critical bug fix, which Apple grants as availability allows.
Phased release, if you turned it on, lets you pause the rollout for up to 30 days. A pause holds back the automatic rollout. Anyone can still download the update by hand, and the users who already updated keep the bad build until they install a fix. Mobile-first teams treat pre-release regression as non-negotiable because the store gives them no way to pull a bad build back from users who already have it.
How Pie Tests React Native Apps
Pie is an agentic testing platform that tests a React Native app the way a person tests it, by looking at the screen and acting on what is there. You never write or maintain a testID for it. Four steps.
- Explore: Upload the iOS simulator
.appand the Android.apk. Agents explore the reachable, supported flows and generate test cases from what they find. Nobody adds atestIDand nobody scripts a path by hand. Screens behind a login need working test credentials. - Recognize: At run time the agent works from a screenshot of each step. It can identify a login button by what it shows and where it sits, including on a screen a refactor reshuffled an hour ago, and then it taps those coordinates. You write no selector for it, so there is none to maintain.
- Act and verify: The agent taps and types through the flow, then checks the result it was told to expect, such as the dashboard loading after sign-in.
- Review and fix: Findings land as issues with the steps that produced them, for your team to triage. With repository access connected, Pie Loop can draft a proposed fix as a pull request for someone on your team to review and merge.
Pie runs your builds on iOS simulators and Android emulators, with real devices available on demand. It is a stochastic system rather than a deterministic one, so treat each finding as something to triage before anyone acts on it.
Our docs walk through uploading React Native builds. In an Expo project, an EAS build profile with ios.simulator set to true produces a simulator build, which you zip before upload, and one with android.buildType set to apk produces the Android file.
For React Native specifically the argument is short. The end-to-end layer rots because it is bound to identifiers. Remove the identifiers and the identifier upkeep goes with them. A UI-heavy, fast-changing codebase needs that more than another matcher API.
Keep the Bottom Three Layers. Rebuild the Fourth.
Testing a React Native app well is a sorting problem before it is a tooling problem. ESLint, TypeScript, Jest and React Native Testing Library handle the bottom three layers well and stay cheap to keep green. Leave them alone.
The fourth layer is the one to rethink. The selector-based options in it all ask you to hardcode an identifier and then defend it through every redesign.
Someone on your team will rename a testID next week, and with a selector-bound suite that means a red build and an afternoon of triage. Pie tests are not written against the testID, so renaming one is not a repair job.
Hand Off the Fourth Layer
Keep Jest and RNTL where they are. Let Pie test the top.
Frequently Asked Questions
Test it in four layers. ESLint and TypeScript catch errors before anything runs, Jest covers pure logic, and React Native Testing Library covers component behavior without an emulator.
End-to-end tools drive the compiled build on a simulator or emulator, and that layer carries most of the upkeep.
Each one wins on a different axis. Detox waits for the app to go idle, which cuts timing flake. Maestro installs as one binary and needs nothing added to the app, and Appium is the most portable.
All three find elements by a string your test hardcodes. Pie works from screenshots of each step instead.
Measure frame rate, startup time and JavaScript thread load. Use the Perf Monitor and React Native DevTools while you develop, then profile release builds with Android Studio, Xcode Instruments or Firebase Performance Monitoring.
Run it on the slowest phone you support, where the jank shows.
Look inside the package. A React Native build ships a JavaScript bundle, main.jsbundle on iOS and index.android.bundle on Android. Finding that file inside an unzipped APK confirms it.
It is still a native binary that needs end-to-end tests on the compiled build.
Yes, for iOS. React Native's setup docs state that a Mac is required to build projects with native code for iOS, and Xcode and the iOS Simulator run only on macOS.
Android testing works on Windows or Linux. iOS needs a Mac or a hosted macOS runner.
They couple to two things the test does not control. The first is the element identifier. A refactor or a renamed testID breaks the test while the app works.
The second is timing. A long animation or slow network call outlasts a fixed wait, and the run goes red.
You upload the iOS simulator .app and the Android .apk. Pie's agents explore the reachable, supported flows, generate test cases and run them from screenshots of each step, with no testID or XPath to maintain.
Runs happen on iOS simulators and Android emulators, and findings arrive as issues for your team.
Eight years building search and delivery systems at Amazon. The kind of scale where flaky tests block billion-dollar releases. Now CTO at Pie, building AI agents that adapt when your UI changes. LinkedIn →